
Powered by Telkomsel BlackBerry®
Sunday, December 30, 2012

Friday, December 28, 2012
Upgrading ASM from Oracle 10g to Oracle 11g Release 2
This note describes the steps for upgrading ASM running on Oracle 10.2.0.4 to Oracle 11.2.0.1 on a HP UX platform.
To upgrade the ASM, we need to install the 11g R2 Grid Infrastructure software as ASM is now no longer part of the database software as was the case in Oracle 10g.
We launch the installer from Grid Infrastructure software directory - unzip the file hpia64_11gR2_grid.zip which we have downloaded from OTN.
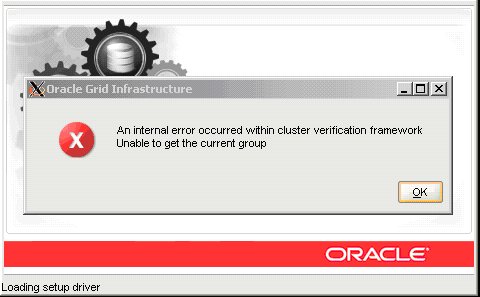
This error “Unable to get the current group” when we launch the installer is a known error for HP UX which is resolved by applying the OS patch OS patch PHCO_40381
Ensure the “Upgrade Grid Infrastructure” is chosen

The OUI detects the running 10g ASM instance and automatically the Upgrade Grid Infrastructure option is selected.

Specify the password for ASMSNMP user

Select the appropriate group – we use dba group for all three – ignore the warning message which will follow.


One of the new 11g OUI features is that it generates some fix-up scripts which can be run to change or modify certain kernel parameter settings.
Click on the “Fix and Check Again” button

A fix-up script runfixup.sh has been generated which needs to be run as root – note some parameters cannot be changed on the fly and require a system reboot.
After running the script, we click on OK and then on Check Again.

Even after running the fix-up script, some kernel parameters cannot be modified without a reboot.
Since this is a test, we do not do a machine reboot at this stage and we check the Ignore All box and click on Next

Note that Migrate ASM is showing the value true


root@inpsidt1# ./rootupgrade.sh
Running Oracle 11g root.sh script...
The following environment variables are set as:
ORACLE_OWNER= oracle
ORACLE_HOME= /data/oracle/product/11.2.0/grid
Enter the full pathname of the local bin directory: [/usr/local/bin]:
The file "dbhome" already exists in /usr/local/bin. Overwrite it? (y/n) [n]:
The file "oraenv" already exists in /usr/local/bin. Overwrite it? (y/n) [n]:
The file "coraenv" already exists in /usr/local/bin. Overwrite it? (y/n) [n]:
Entries will be added to the /etc/oratab file as needed by
Database Configuration Assistant when a database is created
Finished running generic part of root.sh script.
Now product-specific root actions will be performed.
2011-05-17 12:24:49: Checking for super user privileges
2011-05-17 12:24:49: User has super user privileges
2011-05-17 12:24:49: Parsing the host name
Using configuration parameter file: /data/oracle/product/11.2.0/grid/crs/install/crsconfig_params
Creating trace directory
stty: : Not a typewriter
stty: : Not a typewriter
stty: : Not a typewriter
mesg: cannot change mode
LOCAL ADD MODE
Creating OCR keys for user 'oracle', privgrp 'oinstall'..
Operation successful.
CSS appears healthy
Stopping CSSD.
Shutting down CSS daemon.
Shutdown request successfully issued.
Shutdown has begun. The daemons should exit soon.
CRS-4664: Node inpsidt1 successfully pinned.
Adding daemon to inittab
CRS-4123: Oracle High Availability Services has been started.
ohasd is starting
inpsidt1 2011/05/17 12:26:18 /data/oracle/product/11.2.0/grid/cdata/inpsidt1/backup_20110517_122618.olr
Successfully configured Oracle Grid Infrastructure for a Standalone Server
Updating inventory properties for clusterware
Starting Oracle Universal Installer...
Checking swap space: must be greater than 500 MB. Actual 7591 MB Passed
The inventory pointer is located at /var/opt/oracle/oraInst.loc
The inventory is located at /home/oracle/oraInventory
'UpdateNodeList' was successful.

Automatic Storage Management Configuration Assistant ASMCA is a new tool in Oracle 11g for performing ASM administration.
Previously we used to do the same via DBCA in Oracle 10g.
From the installation log files we can see that ASM is being upgraded by the ASMCA which has been invoked by the OUI.
INFO: Starting 'Automatic Storage Management Configuration Assistant'
INFO: Starting 'Automatic Storage Management Configuration Assistant'
INFO: Executing ASMCA
INFO: Command /data/oracle/product/11.2.0/grid/bin/asmca -silent -oui_internal -upgradeASM
INFO: ... GenericInternalPlugIn.handleProcess() entered.
INFO: ... GenericInternalPlugIn: getting configAssistantParmas.
INFO: ... GenericInternalPlugIn: checking secretArguments.
INFO: ... GenericInternalPlugIn: starting read loop.
INFO: Read: ASMSNMP_PASSWORD_PROMPT
INFO: Processing: ASMSNMP_PASSWORD_PROMPT for argument tag –asmMonitorPassword
INFO: End of argument passing to stdin
INFO: Read:
INFO: Read: ASM upgraded and started successfully.
INFO: Read:
INFO: Completed Plugin named: Automatic Storage Management Configuration Assistant

We can see that the oratab file has also been updated and the ORACLE_HOME for the ASM instance is now showing the 11g Oracle Home
.
root@inpsidt1# cat /etc/oratab |grep ASM
+ASM:/data/oracle/product/11.2.0/grid:N
Let us now add a new disk to the previously existing disk group DATA which was created in 10g ASM.
We launch ASMCA via asmca from Grid Infrastructure software home


Note: Right click on the disk group name to bring up the menu


Note there are two types of compatibility for the diskgroup. One is the ASM compatibility and the other is Database compatibility.
- ASM Compatibility: The minimum version of the ASM software that can access the disk group. In 11g, the default setting is 10.1.
- Database Compatibility: The minimum
COMPATIBLEdatabase initialization parameter setting for any database instance that uses the disk group. In 11g, the default setting is 10.1.
Note – before performing the ASM upgrade, shut down any Oracle databases on the same machine or they will be abnormally shutdown when communication to the ASM instance is lost as the existing 10g ASM instance is shutdown as part of the ASM upgrade process.
We can see lines like this in the database alert log:
Errors in file /data/oracle/product/10.2.0.4.5/admin/test11g/bdump/test11g_asmb_15099.trc:
ORA-15064: communication failure with ASM instance
ORA-03113: end-of-file on communication channel
Tue May 17 12:25:08 2011
ASMB: terminating instance due to error 15064
add new hardis on linux
[root]# fdisk /dev/hdb
Command (m for help): m (Enter the letter "m" to get list of commands)
Command action
a toggle a bootable flag
b edit bsd disklabel
c toggle the dos compatibility flag
d delete a partition
l list known partition types
m print this menu
n add a new partition
o create a new empty DOS partition table
p print the partition table
q quit without saving changes
s create a new empty Sun disklabel
t change a partition's system id
u change display/entry units
v verify the partition table
w write table to disk and exit
x extra functionality (experts only)
Command (m for help): n
Command action
e extended
p primary partition (1-4)
e
Partition number (1-4): 1
First cylinder (1-2654, default 1):
Using default value 1
Last cylinder or +size or +sizeM or +sizeK (1-2654, default 2654):
Using default value 2654
Command (m for help): p
Disk /dev/hdb: 240 heads, 63 sectors, 2654 cylinders
Units = cylinders of 15120 * 512 bytes
Device Boot Start End Blocks Id System
/dev/hdb1 1 2654 20064208+ 5 Extended
Command (m for help): w (Write and save partition table)
[root]# mkfs -t ext3 /dev/hdb1
mke2fs 1.27 (8-Mar-2002)
Filesystem label=
OS type: Linux
Block size=4096 (log=2)
Fragment size=4096 (log=2)
2508352 inodes, 5016052 blocks
250802 blocks (5.00%) reserved for the super user
First data block=0
154 block groups
32768 blocks per group, 32768 fragments per group
16288 inodes per group
Superblock backups stored on blocks:
32768, 98304, 163840, 229376, 294912, 819200, 884736, 1605632, 2654208,
4096000
Writing inode tables: done
Creating journal (8192 blocks): done
Writing superblocks and filesystem accounting information: done
This filesystem will be automatically checked every 34 mounts or
180 days, whichever comes first. Use tune2fs -c or -i to override.
[root]# mkdir /opt2
[root]# mount -t ext3 /dev/hdb1 /opt2
File: /etc/fstab
LABEL=/ / ext3 defaults 1 1
LABEL=/boot /boot ext3 defaults 1 2
none /dev/pts devpts gid=5,mode=620 0 0
none /proc proc defaults 0 0
none /dev/shm tmpfs defaults 0 0
/dev/hda2 swap swap defaults 0 0
/dev/hdb1 /opt2 ext3 defaults 1 2
/dev/cdrom /mnt/cdrom iso9660 noauto,owner,kudzu,ro 0 0
/dev/fd0 /mnt/floppy auto noauto,owner,kudzu 0 0
VNC for HP-UX
Downloading VNC
Download the VNC for HP-UX depot tarball. VNC Server and VNC Viewer are included as separate installable packages.
Note: VNC Viewer is freely available to download to as many other computers that you wish to exercise control from as you like.
If you wish to script installation of VNC Server and VNC Viewer together, download the VNC for HP-UX generic installer instead.
Installing VNC
At the command line
Installing VNC at the command line or via SSH is quick and convenient providing defaults are acceptable. To install VNC Server, run the following command as a user with administrative privileges, and perform the standard installation procedure: swinstall -s <absolute path to VNC Server>.depot
Note: This command fails with a relative path.
To install VNC Viewer, repeat this operation for <VNC Viewer>.depot.
Scripting installation
If you want to configure installation, run a script to specify programs and locations.
Licensing VNC Server
VNC Server must be licensed. If it is not, users cannot connect. More information…
Note: VNC Viewer does not require a license key.
Reinstating a valid VNC Enterprise Edition license key
To do this, copy a preserved licensekey file back to /etc/vnc.
At the command line
Obtain a license key, and then run the following command as a user with administrative privileges: /usr/local/bin/vnclicense -add <license key>
Additional steps
VNC is installed in /usr/local/bin. To configure paths for all users, and to provide access to the reference documentation, add the following to /etc/profile:
- PATH=$PATH:/usr/local/bin:/usr/openwin/bin
- MANPATH=$MANPATH:/usr/local/man
Removing VNC
Run the following command as a user with administrative privileges: swremove realvnc-vnc-server realvnc-vnc-viewer
######################################################################################################################################################
Install software
#swinstall -s /tmp/vnc-4_1_1-parisc_hpux.depot
Run vncpasswd
$vncpasswd
Start font server (without it CDE will not be look properly)
#vi /etc/rc.config.d/xfs
RUN_X_FONT_SERVER=0
to
RUN_X_FONT_SERVER=1
# /sbin/init.d/xfs start
Start VNC Server
$vncserver :3 -query localhost -fp tcp/localhost:7000
Solaris VNCserver configuration
and I say only viewer because now the Solaris 10 build 5 comes with the vncserver alredy inside.
all you need to do is to configure it.
This page on the SUN site will give you the detailed explanation on how to do things and what security patch you need to install fisrt ,but the instructions can be summed up in 4 lines:
mkdir -p /etc/dt/config
cp /usr/dt/config/Xservers /etc/dt/config/Xservers
edit this file “/etc/dt/config/Xservers” and add these lines at the end:
:1 Local local_uid@none root /usr/X11/bin/Xvnc :1 -nobanner -AlwaysShared -SecurityTypes None -geometry 1024x768x24 -depth 24
:2 Local local_uid@none root /usr/X11/bin/Xvnc :2 -nobanner -AlwaysShared -SecurityTypes None -geometry 1024x768x24 -depth 24
:3 Local local_uid@none root /usr/X11/bin/Xvnc :3 -nobanner -AlwaysShared -SecurityTypes None -geometry 1024x768x24 -depth 24
And reboot the server.
The lines with the :1 :2 etc at the beginning, are the virtual displays you wish to server to have available for connections, you can add more by changing the numbers to :4 :5 etc.
when connecting to the server with the vnc viewer you need to express to which virtual display you want to connect by adding it to end of the server’s name or ip:
10.10.10.1:3
If you want to connect to virtual display number 3.
Subscribe to:
Posts (Atom)